Well, I’ve been super busy but I’m pleased to say I managed to remain on target re desk chair.
So here it is, not yet finished but at least ppl can now understand what I’m on about.
Ok, so here are the earlier stages in the process..
I covered the buttons. This took a couple of hours.
Then I did the Diamond Tufting, where I basically followed the instructions in this video:
Diamond Tufting Tutorial
This is a fantastic tutorial, grab a coffee and learn.
When I came to make my own piece, kept referring back to the video for hints and tips that really explain what you should be aiming/looking for. In short, you work with the grain of the fabric to keep your tension perfecto. I had to re-do only two tufts, and that was because the backrest of this chair was curved.
By the time I realised how the curve of the backrest would alter my design, I knew what would go where, so made the adjustments as I went along. A lot of people at that point may have felt they needed to re-draw the plan. I knew that was not where the problem lay, because the plan was fitted to the shape. The problem lay in the distance between fabric holes, taking account of the curve e.g. I needed to ‘decrease’ widths on the inner curve.
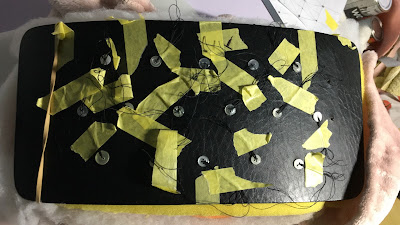
Above is the back of the Tufting. I used buttons to secure the thread as I didn’t want to use more staples.
Next I will have to use Sliding Knots on those threads and tidy up the whole area and cover in felt.
This is the section I’m working on now. More about that next time. This is so far my favourite part. I’m using drum tight mini back stitches, working with the grain and using a curved needle. I must have done this in a previous life, because I sense an innate knowledge of this kind of thing. It is ‘weird’ working on this part of the chair. (Anyone reading this blog knows my interpretation of weird means eerie. Eerie nice and ‘connected’, not eerie creepy)
Gotta go xx


No comments:
Post a Comment