Thursday, 17 December 2020

Bedroom chair up cycle

 Well, I’ve been super busy but I’m pleased to say I managed to remain on target re desk chair.

So here it is, not yet finished but at least ppl can now understand what I’m on about.


Ok, so here are the earlier stages in the process..


I covered the buttons.  This took a couple of hours.


Then I did the Diamond Tufting, where I basically followed the instructions in this video:

Diamond Tufting Tutorial


This is a fantastic tutorial, grab a coffee and learn. 

When I came to make my own piece, kept referring back to the video for hints and tips that really explain what you should be aiming/looking for.  In short, you work with the grain of the fabric to keep your tension perfecto.  I had to re-do only two tufts, and that was because the backrest of this chair was curved.

By the time I realised how the curve of the backrest would alter my design, I knew what would go where, so made the adjustments as I went along.  A lot of people at that point may have felt they needed to re-draw the plan.  I knew that was not where the problem lay, because the plan was fitted to the shape.  The problem lay in the distance between fabric holes, taking account of the curve e.g. I needed to ‘decrease’ widths on the inner curve.


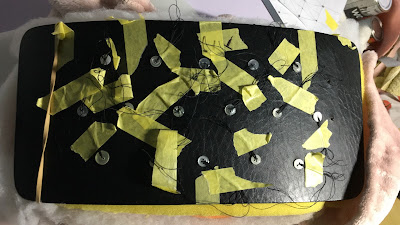
Above is the back of the Tufting.  I used buttons to secure the thread as I didn’t want to use more staples. 

Next I will have to use Sliding Knots on those threads and tidy up the whole area and cover in felt.


This is the section I’m working on now. More about that next time. This is so far my favourite part. I’m using drum tight mini back stitches, working with the grain and using a curved needle.  I must have done this in a previous life, because I sense an innate knowledge of this kind of thing.  It is ‘weird’ working on this part of the chair. (Anyone reading this blog knows my interpretation of weird means eerie.  Eerie nice and ‘connected’, not eerie creepy)

Gotta go xx


Monday, 14 December 2020

Completed desk reveal

 This is a super quick post because I am swamped with work but also very excited about how the Diamond Tufting has gone.

But for now, here is my darling old desk, putting its best foot forward once more and a very pleasing addition to the minimalist bedroom.  


The last photo is a bit dark but it shows the driftwood modesty board and the inner shelf.

I would say the Zinser BIN was excellent, but you do have to de-wax it quickly with White Spirit and a rag, before applying the latex paint.

Finishing drawer fronts, desk top and blue painted leg supports with polyurethane water based varnish means it’s hard wearing and easy to clean.

I am very pleased....(it is usually quite difficult to please me).

The whole thing took, on and off about 6 weeks, which is a long time but no part of it could be rushed or fudged. 

Here is a close up of the finished top. I used Rustoleum Weathered Wood: White Smoke and Ash Grey.


I am pleased to say, the desk has passed the test, in that in years to come, when I retire to Carbis Bay to paint seascapes until my number is up, the desk will be loaded onto the lorry.

Now back to my Diamond Tufting x


Wednesday, 9 December 2020

Diamond tufting chair back

 Oh wow, another challenge for time-poor headless chicken.

So diamond tufting is an exact science. It needs a grid, it maths, it needs rulers and all kinds of things that make you want to knit instead.

So, I worked on my design from the inside out, being a bit different and very fussy.

I figured the centre of the chair back needs to have a diamond right in the middle.  If that diamond is not where it should be, the whole thing will be horrid.

So I drew out my first rhombus, two acute angles and two obtuse angles, in proportion to the thickness of the foam.  2 inches, that’s the only maths I’ll touch.  I’m an artisan through and through.

So here’s the design...


Ok, so you can see the central diamond is cut out and stuck to the middle of the chair back rest template.

Now all I have to do is drill holes into the pink dots.

The template took 10 minutes to draw up, what took forever was driving to the store for the self cover buttons.  The traffic was very congested and anyway, that’s done, so tomorrow I shall start drilling.  

I had to order the tacks from an online retailer, they’re not here yet, so only the holes can be done tomorrow.

I cut the foam for the seat with an electric knife I borrowed from my parents.  It went through the foam like frozen butter.

Here is the seat...


Yes, it’s pink fun fur with gold highlights. I doubled the fabric and used the staple gun, as you would tack down a canvas for a painting.  The front of the seat has a dip and consequently looks like buttocks.  This was not planned for, obviously and I’m hoping the tacks I bought are going to be good, because if they are I shall tack round the seat too and hopefully that way the buttocks suggestion will fade out (?).

Stay sane,, gotta go xxx


Monday, 7 December 2020

Desk finished, now working on chair

 Hey ppl, outside there is freezing fog today.

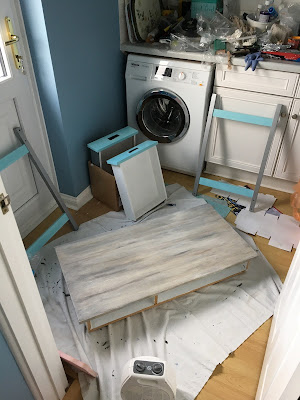
I managed to finish the desk, but not after a last minute go to moment of sanding and refinishing the desk top.

The polyurethane water based varnish I used reacted with that wonderful colour I’d achieved, so much so that the patina looked like it had been subjected to 20 years of nicotine.  I had moved the desk back into the bedroom and immediately I just couldn’t live with the results the varnish had caused.  The desk was basically 30 shades darker....what!

So I hauled it back downstairs (it weighs a ton) and went at it for 10 mins with my trusty sander, then repainted it much lighter. 24 hours later I did the same and 24 hours after that, I applied the same varnish, but this time watered down by 25%.  It says on the tin not to do that, but I had a further trick up my sleeve.

I then grabbed a fan heater, set it to hot, closed the door and maxed out the dying time of the varnish to about 05 mins.  Went in, exchanged the air and then did the same again.  

I didn’t have time to reassemble the desk, so set to work on the chair. I’ll show pictures of the chair next time, because the seat is reupholstered and the primer is done, but I’m still working out the design of the back rest, I’ve decided I want buttons...what have I let myself in for....?

So here’s the ‘seaside’ themed desk....


I used Zinsser BIN for the primer coat to block out the woodstain and finished with latex eggshell.  There are no splinters anywhere now, or dark bits.  I used wall paint Matt on the drawer fronts and finished with polyurethane varnish again, they’re very nice and satiny now.  I like to look at Matt, but in a situation where you have to interact with it, it has to be Matt varnished too.  I could have used latex satin, but the way I did it, it’s even more durable.  The blue is darker now as a result but the room it’s going in is pretty dark, so it’s toned down up there. 

Stay busy people, it will get us through...