Showing posts with label Tassel Formers. Show all posts

Saturday, 8 August 2020

Tassel former 3

Ppl, you are going to thank me, because I’ve cracked it!

Now first off can I say on Monday I plan to post re Opus Anglicanum, calling it Part 2.

Today I will show you how to do ONE of the two stitches used for tassel former creative lovelinesses in the past and hopefully the future.
My hands are trembling with excitement at the creative possibilities of this ancient craft...

Ok, here goes, first one is Left Side Stitch:
(Left so called because the working thread comes out to the left of last stitch formed)
Fixed point set up and brown.  Worker thread blue and you come out in front and go over the brown.


Then you grab the tail - from the front - and pull it up and to the right.

Then you pull it across to join its friends

Now if you keep working round and doing exactly the same stitch over and over again, wouldn’t that be so incredibly boring?

That is why tomorrow I will show you how to complete stitch number 2, which pulls in the opposite direction, to the right.

Of course, you can try to work it out for yourselves in the meantime....(implied challenge there folks) or you can wait until tomorrow.

For now, this is a diagram of what you are trying to achieve:


I’m off now to drive my parents to Great Yarmouth for the day.
Been reading about the Pleasure Garden at Vauxhall, a place where the Duke of Devonshire more than likely met Charlotte’s mother, the milliner.  Could also have been where he bought so much art...

Friday, 7 August 2020

Tassel info 2

*Ok, so my very close-work is on hold for a couple more days, as the day job backlog gets sorted out.

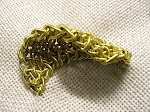
Ok, so the tassel former pattern is technically called:
Simple warp wrapping over a circular weft.

Now that sounds really scary, and what I say is, forget about that, its just jargon, techno babble, knot theory blah.

Forget also that it ‘looks‘ really, really hard to do, and just let yourself drift....

Go right back in time.... to when when people couldn’t read.
(I’m not being disrespectful when I say even one of a Henry VIII’s wives couldn’t read, I think it was JS...)
So it went, all the way up, from field hands to nobility.

So, what do you do with that mindset : you copy!
Think visually, have a fiddle and copy.

So, what are we actually looking at here:


Starts small, ends up much bigger.  Must mean adding more threads.
How to do that invisibly: use Larks Head Knot.  See next picture...


The tassel formers have up to 55 threads going round at their widest point.

Now here’s the really fascinating drum roll part:
There are two stitches.
Only two!
One pulls to the right.


The other pulls to the left.


What looks really difficult to us now, was actually very simple then, but made to look like it was insanely complex, rather like the long tradition of knots and interlacing.

So, the thing that takes the longest is rigging up your ‘fixed point’ and sitting on the correct side of it so that you can turn the work the right way.

This sounds simple, but  um.....you also need to turn the work upside down beforehand......That is the biggie. Only that.  Handy that we have two eyes in our heads to watch that the right side is worked tho’....!!

The right side of Larks Head Knot is a perfectly smooth imitation of the stitch you are using.


Larks head the wrong side is horrid, truly truly horrid....do you see the ridge across the front, this is NOT what you want to see in this context, ever...


Then, once you get going, it’s very very fast.


Here is my modus operandi.....fixed point being cellotaped weft to table.

Thursday, 6 August 2020

Tassel Formers

I’m taking a short break from the Mermaid, but this post ties in with my reference to Soumak Weaving.

I haven’t seen anyone yet make the whole deal on the tassels of repro Swete bags.  

Then I found an image on Pinterest that started to bore a tiny hole in the side of my head.....oh no, here we go again, another puzzle....(in fact I might do a little video on this technique)

So I had a few goes with a tapestry needle and my trusty wooden spoon...

Then remembered in the book ‘Sweet Bags’ by J Carey, she explains how to make them...and they are not made with a needle, although the mechanics is basically stem and outline stitch.

When I first read that chapter I thought it looked tricky, but actually it’s very, very easy and dare I say...addictive!

Its basically a ‘manual‘ version of stem stitch.

It gets really interesting when you go under instead of over on the next pass and manage to create the most stunning floral motifs.

So here’s  the reason why I need to work out how to do it...
Royal Collection Bag

Can you believe that bag!