Thursday, 28 October 2010

The quest for ‘everlasting’ gardening trousers continues

(I pulled this post because its not ‘on topic’ but I’ve decided to reinstate it because I love these trousers and I love gardening)


Well before I take a day off and stick the car in cruise control and head up the M40 to take copious notes and make little sketches of exhibits at ‘Wrought With a Needle’ exhibition that I informed you about last week (can’t wait).  I decided I was just too embarrassed at the current state of my ‘ventilated’ gardening trousers and I really should take matters in hand. 

I decided to do more that just patch them this time.  As we all know, continually reaching for the (dear) kneeling pad during an arduous stint of being on all fours down among the weeds can get a bit boring.  So I decided to sew the kneeling pad to the knees, as it were !!!  

So off I went and bought these very sturdy strap-on kneeling pads with velcro fastenings.  They’re good and strong BUT, the straps cut into the back of my legs and they ride down, so I thought I would make them more integral, if you know what I mean.

I bought a strong (revolting) skirt from the thrift shop, that happens to have a slightly fluffy texture and used it to cut out 4 patches for the outside and inside of the knees, as I find its much nicer to kneel on soft fabric than hardwearing denim and that way I don’t have to cut any trouser fabric away OR darn them. 

I used the knee pad as a template, leaving a little border all the way round. 

CIMG4058 CIMG4059

As you can see, I’ve patched these dear things a whole heap of times.  They’re just plain old favourites and I love them so.  PLUS they have the added value that when I put them on I instantly feel like gardening.  Believe me when I say, they are imbued with the positive energy that comes from being in contact the sun, soil and slugs…

CIMG4061

‘Heat & Bond’ is really great for so many things.  I love it because its so ‘clean’ and even if you do get a bit on your iron, its not a problem…

As its basically double-sided fabric adhesive you place it on the back on the material first, iron for 2 seconds - for light fabric.  Let it cool and flip your fabric over and do the other side, according to where you want to stick it….(remember to protect your ironing board cover and I also use a piece of muslin to protect my iron’s plate). 

CIMG4063

Here’s the first patch – nice and flat – no bubbles!

CIMG4064

This is what it looks like as you pull the backing paper away, as you can see, it comes off really cleanly. 

CIMG4066

And here are all 4 patches ready for the next stage. 

CIMG4067

I would add that when I came to iron them on the fabric side, I did need to do it for a lot longer than they specify on the instructions, as it was very thick material. 

In fact, I probably used the wrong grade of product for the job as it was really only meant for ‘light weight’ jobs.  Pleased to say though that I managed to ‘save the day’ by just persevering until the thing did finally stick down as it should.  They feel ultra starched now but that will disappear when they are washed.   

It was too late to finish the job on this occasion.  Next I need to run the borders off on my machine. 

When I come to do that part, I shall first have to fit the pads around bent knees to gauge how much ‘give’ to factor in.  This part is crucial and I’ll probably do it a couple of times to get it right. 

Meanwhile, I’ll give a little thought to the best way of fastening the pads to the knees? 

  • If I machine round the edge that will make them very durable but they will be too tight when I kneel – I’m aiming for a textile outer knee-cap idea….-
  • either I go for small lengths Velcro or I stitch elastic to the four corners and machine them to the trousers??? 
  • Also, if the basting is permanent, then I need to be sure they are machine washable.  I think they are? there’s no label but they look pretty well INDESTRUCTIBLE (*prays they are*)..

Looking a lot better now wouldn’t you say :)

CIMG4068

cya !

Wrought with the Needle – exhibition

(I’m reinstating this post as I had a great time seeing this show and I hope to blog about it very soon – however, I’m presently working on my next video and pouring over my recent spending spree of very delicious BOOKS!)

For lovers of historical context notes, I should point out that I’ve changed the heading on this blog, if you see up there.  Reasons will be made clearer in the coming weeks…


*****THIS EXHIBITION HAS BEEN EXTENDED*****

Thought I would mention this forthcoming exhibition of “Art treasures of English Domestic Embroidery from Elizabeth I to George II” which opens next Monday at Witney Antiques, Oxfordshire, admission free, catalogue £12.00 in UK (they also ship internationally). 

Whitney

Open daily 10.00am to 5.00pm from 18th – 31st October 2010. 

Their address is:

96-100 Corn Street

Witney

OX28 6BU

Tel: 01993 703902

www.witneyantiques.com


Looks like its going to be a really good one and as I can no longer obtain my own copy of ‘Twixt Art & Nature’, I plan to pop along.


In case I meet any fellow ‘Betty Addicts’ there, as no one knows what I look like, maybe someone will recognise me from my battered gardening knees….. hahaha!  Can you believe I’m running a needlework blog and yet actually walk around in these things?  Oh dear, now that my neighbour has, erm, raised his eyebrows at this eccentric spectacle, I’ve decided to move everything over and set about making some improvement to my favourite gardening trousers that will be REALLY durable this time. 

CIMG4047


Mystical Cornwall is still whispering in my ears…

The 15th Century church in St Ives called St Ia has a magnificent font, among other things.  I would have loved a photograph of that.  In case you didn’t know, when the Celts became Christian, their Baptism water was brought up from their ancient pagan holy wells…because the water was considered lucky…

So, I thought I’d show you a postcard of one of St Ia’s wonderful Bench ends instead.  These were restored in 1940 and are typical of 15th Century Cornish carving with its “deep cutting”.

bench end

cya !

Wednesday, 13 October 2010

How I made the Gold Acorn

From tiny acorns, mighty oaks (+long posts) grow…!!!

(Continuing on from last time…)

Well, I’ll start by saying that I’m (dare I say) proud at having worked out exactly how they made these acorn structures on the historic swetebag. 

As you’re aware, I didn’t have any books to assist me, and I’ve explained before, modern Stump Work books don’t cover these earlier, much more complex ‘trade secrets’, from what I can tell. 

It wasn’t easy, at first and I thought for a long time I would never fathom it out, but I regard The Bag as a kind of  tough Sudoku puzzle (which I love) and as you can tell from the pictures below, I got there by trial and error and not by making the theory fit the experiment. 

This proved to be a very satisfying endeavour as I also found out along the way, that the process the Elizabethans used to make the acorns is very old and in fact a Viking technique for metalwork chains!

Now you might not be very excited at that revelation but, for now, I just want to say that I can’t help but notice that the Acorns, the Turks Head Knots and Plaited Braid Stitch, all start exactly the same way….with a ‘pretzel’ formation of loops…(more about that later). 

OK, so before I launch into my storyboard-how-to I just wanted to say that I’m no longer going to call this stitch ‘Ceylon stitch’ because I think that in this context its a misnomer, as it definitely had a different name in Elizabethan times.  (We don’t know what it was called back then, but there’s plenty of room for more research...)

The other thing we have to remind ourselves of is that London is a 2000-year-old city and that its goldsmiths – who later formed Guilds and the Guilds have a long history of the cross-pollination of ideas - have operated from exactly the same location since Saxon times.  Their furnaces, underground vaults and mysterious traditions were passed down from generation to generation, without a break.   

So for the purposes of this blog I’m going to give this stitch its correct Viking name which is: Osenstitch (otherwise referred to as a looped mesh and not to be confused with Naalbinding or Mammen stitch). 

Osenstitch is also referred to as ‘Viking Knit’ and ‘Trichinopoly chainwork’ and is very similar in construction  to Vandyke stitch.  (I hope to post my research links next time.)   

Ok, so here goes:

If you recall I said I needed to work out how to:

  1. make ‘Ceylon stitch’ keep its shape to produce unstuffed cylindrical shapes
  2. that are closed at the top and
  3. widen out once, near the bottom and
  4. work up very small and neatly.

This is my first (rather squashed) attempt.  From it you can see its all wrong and its cotton and I was panicking (but undeterred all the same!). 

First attempt

You might think I should have used metal thread from the outset but if I can explain, I can see about 10 different views of these cylindrical structures on The Bag and each of them tells me something different.  From this I made a composite picture in my mind of what you could, and couldn’t do with this formation.

Looking at this section of the Museum image for the first time, I was struck by how regular the stitches were.  They are indeed very tiny and consistently perfect added to which, each acorn is exactly the same as the next. 

From this I inferred that they were probably self-supporting stitches in themselves, or dimensional, and that the acorns, in all probability, were not stuffed.  I was also obsessed with replicating the neatness and scale.  I convinced myself that working that small was going to give me eye-strain.  But I’m pleased to say, the result was nothing of the sort and I reiterate: they are easy to make! 

Foundation Stitches

The base line stitches used this time is a simple backstitch.

All the acorns are started in the same way and I could see that the tiny backstitches had been pulled somewhat out of shape and stretched in the process of constructing the acorn, as you will see later.

001

Open first row of Osenstitches

For the first row of Osenstitches I’ve kept the stitches fanned outwards.  I found I had to do this otherwise the shape goes in on itself.  It also helped for the 2 into 1 increases I had to do next.

This was the only row of increases I had to make, as the rest is worked straight up.

Below you can see I’m using my index finger as a support.  This method was working well for a while and I was reasonably pleased at this stage, however, my finger became cramped and my stitches started to become irregular.  I concluded they did not use this method as the results were inconsistent.

002

Below I'm pulling it to one side to compare the look of the thing, to the image.  I was pleased at the way things were progressing but I was still unhappy about bending my hand round to work the circular rows around a finger that was aching and had become just too awkward. 

003

Below you can see, I continued working a few more rows and the shape suddenly started to behave itself and form into a tiny (very neat) cup.  I knew then that the shape I was aiming for was not deliberately shaped by complex increases or decreases but merely grows upwards.  Also that the thick, inner rows of the reverse side of the stitching help greatly to maintain its shape.  

004

After that I decided to do the same in gold thread.  you can see it works OK but, believe me when I tell you at that stage it was still very untidy compared to the historic bag. 

However, I was content with the look, of the now elongated foundation stitches.  You can see below that the base line of backstitches have indeed stretched quite a lot, just like on the real thing.  However, this feature doesn’t detract from the overall impression of an organic cup kind of bursting out of the background fabric.

01

Below I’m taking the next stitch and notice how this method of working means ‘Ceylon stitch’ is actually upside down and by so doing you can pull it up in a very smooth way to tighten the stitches and thereby achieve neat very compact neat columns of stitching.  I also found out you can get a really good grip on your work if its upside down like this, unlike the directions in modern diagrams.  

02

By this time I decided my finger had had enough and I would simply have to find something else to work against as the work was narrowing and becoming too tight to continue with. 

However, when I took my finger out I was very encouraged by how the little stitches were looking and I could see that I was probably going along the right path, together with the fact that I could tell very clearly where to insert my needle each time and thereby picked up more speed.

05

So then I decided to have a little rummage in my workbox and found something much better suited to supporting the work than a (red index) finger, which was the *plastic handle of my seam ripper…

Below I’m making one complete stitch in 3 stages and you can see how easy it is to tell where to put your needle next time, as the firm support beneath pushes the proud crossed arms of each stitch out to make each column much more prominent.   

CIMG4024

CIMG4025

CIMG4026

CIMG4033

I think I mentioned before, because there are 10 examples of this structure on The Bag, I kind of worked out that they had to be made at a reasonable pace and could not have been too fiddly to execute.  More importantly, that the method of construction could be relied upon to produce consistent results.

See how tiny you can make Osenstitch in this way.  

Historical Context

Let me interrupt at this stage by including some historical background.  The Vikings made silverwork cords with this stitch by using just the end of the wire, no needle. 

They had many uses for these silver or gold cords and examples have been found where it is used as embellishments on  seams of clothes and jewellery. 

To support the work they would use a metal rod in exactly the same way as I used above.  The jewellery made from this type of chainwork was taken one stage further.  Once they decided how long they wanted the chain to be, they would then fasten it off and  pull the entire length of cord through a small hole in a wooden frame.  The holes in the wood were of varying sizes.  In this way they could produce very fine and yet strong silver wire.  They would also cut lengths of chain into sections to trade for goods, as a form of currency. 

Apart from its practical uses, the fact that the Vikings brought to England their solutions for lifting hitherto 2-d concepts of interlaced design into 3-d form is very significant…(more later).  

I’ve since researched a little further and found out that the concept of (metal) cylinders made in this way are probably an idea the Vikings picked up from their trade with the Byzantine world.  In fact the Byzantines often worked their form of  ‘Osenstitch’ more openly, whereby they could produce tiny ‘cages’ or hollow pendants into which they would ‘secrete’ precious items and display them on necklaces and earings.

CIMG4034 

Closing the cylinder

To close the top is also really easy.  For this you simply whip into all the stitches that make up the last row and pull the top closed as you would a miniature drawstring. 

CIMG4036

One more observation

Below you can see that when its finished and pulled to one side, you get a bright crescent shaped highlight at the tip.  This is just as it appears on the historic Bag.  I spent a long time wondering if that highlight was in fact a spangle attached to the fabric but I’ve proved to myself, it is in fact the light catching the top of the whipped stitch closure. 

3

Finishing off ready to start the next acorn

To finish it off, you just take the thread back down through the centre of the acorn to bury it in the fabric and emerge where you want the next one to spring up. 

CIMG4044

See how tiny you can make Osenstitch (Ceylon stitch) this way (fingernail size)... Its my guess there are possibly hundreds of (wickedly cute) things you can make with this idea….(o-oh, there I go again…)

*  I’ve decided I won’t use my plastic seam-ripper next time as its now covered in tiny scratches.  Instead, I plan to dig out some kind of small metal rod alternative from my DIY toolbox

__________________

Well, we returned from Florence a while ago but went away again, this time to wonderfully wild Celtic Cornwall.  With all its truly amazing ancient, early Christian wheel-head  crosses, holly wells, stone circles and hill forts.  Naturally we took the A303 to pass the awesome Stonehenge – can you believe that they actually considered knocking it down during the war for reasons of national safety…

Florence was great but they confiscated my scissors before the flight and I (had to) sit next to a (very nice) chatterbox… And yes, I was frog-marched through the Uffizi Gallery (of all places) and consequently missed the iconic Botticelli (!).  However – I did manage to see some amazing Renaissance vestments off the main building of the Duomo, (up lots of stairs), in Sienna and some beautiful medieval wedding celebration embroidery at the Jewish Museum…(more next time).

cya!

Wednesday, 8 September 2010

Elizabethan 3-d hand embroidered Acorn

Finally, (after much panicking) I am very pleased to say: here is the 3-d non-wired & non-stuffed, self-supporting gold Acorn - worked in Cylindrical Ceylon Stitch - of which there are about 10 examples on The Bag – 5 acorns, one butterfly and the rest made into flattened out flower petals, that has been on my mind constantly and has jumped the Bag motif queue here..

CIMG4044

Below it’s placed next to its Big Brother – I know, looks awfully like a peanut, but on the real Bag they made them out of 2 colours to distinguish the cup area….yep, they thought of everything and I’m sure you’ll agree, this is a very clever solution to making nuts just from sewing;  no ‘props’.

2

Below I’m pulling it to one side to show you how it would form into one of those magnificent highly raised petals for a flower I haven’t yet shown you a drawing of.   They squashed it flat for that element.  

3

Below is my main cotton mock-up.  After I made this miniature cup (plenty of possibilities there for miniature bits and bobs e.g. an entire mini-tea set – o-oh, there I go again!), I knew by then I could probably pull out some Smooth Passing Gilt Number 5 supplied by Dear Bill and not waste it

Well, all I can say is: then the real fun began…..(more later)

Acorn cup - Ceylon Stitch 1

Notice I use the description ‘cylindrical’ and not ‘spiral’ – important reason – details to follow…

Also notice the base is narrower than the rest BUT the shape grows naturally upwards, NOT outwards, (unless you increase of course)…..more later

Skill level = easy !

I look forward very much to explaining how I made it soon (its in draft, but no surprises if tell you its pretty long…..:)

________________

Decided I’ll take the Aemilia Ars lady with me to Italy and try and get it finished during the flight (hopefully I wont have to sit next to anyone that wants to talk?).  You never know, I might get to the Museum where the original artefact is stored (*tingles with anticipation*).  DH & DD are not mad-keen on Museums, they actually frog-marched me through The Rijks Museum in Amersterdam during their enormous exhibition on The Ottoman Empire – can you believe that!!) – will have to work out where I can deposit them as soon as I get there!!! 

cya !

Sunday, 29 August 2010

Update & idea for an embroidered ring

Aemilia Ars Renaissance Lady

(This is an especially long post – I wish I could cut it down, but such is life…)

Here’s a quick sketch I made with Conte pencils of what I think the Aemilia Ars lady would have looked like fleshed out.  As you can see, she had to have been very young,  and reminds one of a mystical figurehead from an ancient ship.  I once did an extended art project on sacrificial images, specifically looking at all the figureheads stored in the hull of the Cutty Sark.  Its such a shame those artefacts have perished.   (More about this W.I.P. further along). 

Important matters to be addressed
Due to finally getting the chance to experiment with several serious issues concerning the repro bag, I have decided that I may have jumped to incorrect conclusions and now find evidence to the contrary.  My recent discoveries make life kind of easier but in turn present new challenges. 

The three things are:

  • Acorns on the bag
  • Diagonal migration of DBH
  • Trellis stitch using only metal thread.

First off - Diagonal Migration of DBH.
As you know I am left-handed and I start DBH the opposite way to right-handers.  It was recently brought to my attention by an EGA teacher (guess who) that diagonal migration for DBH is a red-herring (Thank you, I appreciate it). 

I have not yet had the chance to find out exactly why this happens, but the Aemilia Ars lady proved to me that if I start at the other end, then I don’t get that weird visual data. 

In other words, I may have to rethink where I start motifs in order to negate the diagonal tendency e.g. when I started the Ars lady from the neck I got the diagonals but when I started from the forehead I did not.  (I think it boils down to the old ‘flip and rotate’ conundrum for us lefties.)   

I will spend some time working out ‘what is what’ on this topic, but I just wanted to say for now that, even though I am left-handed, if I can, I prefer it if my work doesn’t betray that.  (I know; why be ashamed, blah…its not really shame, its about wanting to be mainstream.)  

Next: the Acorns
The acorns and the cords have given me more cause for concern than anything else on the bag.  It was so interesting to meet with Bill Barnes recently (he of Golden Threads) because of his own volition, very kindly pondered the cords for a long time and actually offered to ask a contact of his to make them if I didn’t feel I wanted to take that on, as well.  Its nice to know I have a back-up plan, but my view is, the cords ‘go with the territory’. 

Acorn Nitty-Gritty

Now I need to rewind a little here: If you recall, when I received the image from Florence (The Bag was made in England, it’s stored in New York, and the image came from Florence) I was struck by what first appeared as  tightly worked reverse-side Trellis stitch they had used for the acorns.  I think I mentioned, that it appeared to me then, that they may have been worked in 2 sections, then sewn together to produce firm little cylindrical forms.  Here is a mock-up of what I thought I was seeing:

Trellis Stitch Acorn 

See how from a certain distance, the chevron rows of Trellis merge in the eye, to become neat pairs of crossed ‘arms’ and those appear as regular columns, if you do as I have done here, and let the mini-fabric curl naturally.   

Tight Trellis Stitch mesh impossible with metal thread

Well, because I couldn’t find fine silver thread that would form Trellis knots without ‘jamming’, I went to see Bill Barnes in the hope that he had something better suited to the task.  (Going to see him was a cost-saving exercise - I keep telling myself - even though it cost quite a bit to get there and devote the time – still it was very kind of him to see me, as he  doesn’t usually meet with customers.) 

However, now I have had the chance to really sit down and try and sort out which of my three versions of Lurex is best suited to the job, one is from abroad and the others are English.  

I’ve thoroughly tested all three and concluded that basically you can only ever make a very loose-looking reverse side Trellis with silver Lurex thread, which is the finest metal thread available today.  Try as you might, it will never take on the appearance of the tightly worked chevrons on the acorns of the bag. 

This prospect was very disheartening.  I kept asking myself, ‘if I’m using foil and the Elizabethans used real silver, surely the foil could work up more tightly than the silver, not less so?’  On the contrary, Lurex will only go so far in completing the little knot, then it jams and if you continue to pull it, you just get the dreaded splitting and unravelling. 

So, with that, I returned to look at the image on the computer, but this time I didn’t look at the acorns and instead took a wander halfway down to examine the body of the little blue butterfly which  had been worked using similar methods but much more loosely. 

You might think ‘well why didn’t you notice that before’ and I have to admit there is an element of ‘not seeing the wood for the trees’ but you have to understand, the tension used to make the acorns is much, much tighter than that used for the thorax of the butterfly, so much so, I honestly thought they were different stitches. 

You might also be right in wondering  if I established the presence of  the characteristic lower knotted area that would identify it as Trellis stitch, truth is, even tightly twisted silk (and we do not know exactly how tightly the Elizabethans twisted their silk) does untwist with time and from the pieces I have seen where this has happened, the Trellis knot does appear looser and smoother.  The distance at which the image was taken was also confusing me.  

Ceylon Stitch Butterfly

This butterfly has worn a little loose because it lies exactly where the bulk of the bag would have protruded.  Hence, I found this had exposed the connecting thread between two particular stitches and those stitches were larger as a result.  This enabled me to really see that they were made not by knotting the thread, but by looping it, as you do with Ceylon stitch.

We also have to remember that the image I have is medium definition (£32 all in) perhaps the high resolution (£110) would have cleared up the confusion a lot quicker but I found that price tag to be prohibitive.

To support this updated opinion, I’ve gone back and looked at lots of other examples.  This means, in my view, that Trellis stitch still appears to be one of the network buttonhole stitches that was not worked historically using metal thread, either blended with silk thread, or on its own.  To summarise, they had the same problem then as we have now.  (I have mentioned before GST is not suited to it either – please see relevant discussion on that topic here.)

2-Sided Cylindrical or spiral working of Ceylon Stitch?

If I am now to consider making the acorns out of spirally worked Ceylon stitch, it begs the question of what inner support the structure has?  This whole topic is very interesting because in my view, The Bag is not exactly Stump work per se.  It anticipates, later Stuart Stump work, but is about 60 years earlier.  Textile scholars have given this type of embroidery the name ‘Elizabethan Flying Needle Lace’. 

If you would like to see a really good video that discusses a famous Stuart Stump Work casket in detail you should click here.  The sound quality is below par but the close-ups are excellent.  To quote from it: “In 1660 there was an explosion in decorative arts as a result of the Restoration of the monarchy."

Historical Context Notes

The construction methods  of Elizabethan 'Flying' Needle lace * ‘follow on directly from what they had learned from the tradition of embroidered Book Binding.  Wherein they discovered that the embroidered bindings lasted longer if metal thread were added (and blended? with) the silk’. 

This also makes sense in terms of Swetebags and clothes, as they would have to undergo a certain amount of abrasion.

* Paraphrased excerpt from Erica Wilson’s Embroidery Book, 1973 Pub. Charles Scribner’s Sons. 

From what I saw at the V&A recently, later 'Stump work' for the most part abandons the custom of blending metal thread with silk and instead utilises wires to support the 3-d structures.

Back to the Acorns

I can see that the lower stitches are wider than the top half and that the foundation stitches are many and elongated.  My initial guess is that they used a backstitch for the base line.

Did they use a rolled-up inner support?

I made a tiny support by rolling up some bias binding and using one strand of silk and one strand of gold Lurex and kind of turning the work as I went along.  It proved a very difficult exercise and I was not happy with the results and figured out that Ceylon really needs even markers at the sides for it to pull up correctly, so now I come back to my initial understanding that is, it had to have been made in two halves and not spirally.  

So now I’m going to try working it along one half of the supportive padding, using evenly spaced edge stitches, then doing the same for the other side, like this:

Acorn diagram

It remains to be seen if I leave the little supports in there because on the historic acorns the shape is flattened out somewhat.  Next time I’ll use some folded over linen instead.      

_________________

We’re hoping to visit Florence soon – hence my enthusiasm to complete the Aemilia Ars piece. 

Just to say that, you may have been able to spot from the images I posted last time that I made a mistake quite early on there (and it was a dreaded biggie).  It only became apparent when I came to work the chin.  Pleased to say I’ve corrected that now, more later…

_________________

We’ve just returned from a blustery Brighton.  I love that place it for the creative ideas it gives you. 

This time I was particularly struck by all the amazing costume jewellery rings made into yummy flower motifs, like chunky moulded leather roses and ethereal electrical- wire flowers. 

So taking the Elizabethan lessons of ‘making embroidery more durable and thereby able to withstand a certain amount of abrasion’, I’ve decided to embroider a ring using those techniques.

It might turn out to be a bit more Baroque than Tudor, but I don’t mind.  The important thing is to get these old ways out and do things with them!

Here’s the craft shop ring I intend to use.  This one comes with a handy ‘sieve’ which will be great for anchoring all sorts of stash-busting embellishments…

CIMG3937

One of the things I intend to do with it is this:
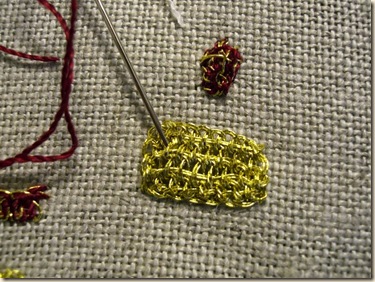
CIMG3939

Can’t say I’m a huge fan of Lurex but doubled-up as it is here, I find it much more workable.  This is a fingernail- sized piece of trusty old 3-d DBH. 

Not sure yet if I’ll sew the DBH petals directly onto the sieve or use a tiny piece of linen then attach that to the sieve?  One of the things I have to keep in mind is to watch out that the little prongs will still be able to grab over the increased bulk.  It’s still at the drawing stage but I’m getting my materials together, especially some of this Pearl Purl that is now going spare… 

I’m making it as a gift and the recipient prefers silver.  So, to get some more Elizabethan jewellery ideas I visited this cool lady’s website: Alyxx.  (Btw, if you go about two thirds of the way down the page there, you can see the reticulated pattern she chose for the Partlet, it’s the same as the one I chose for the Girdle Book.)    

Oh, and look what arrived from Paris after they had  their customary 2 weeks of August shutdown…
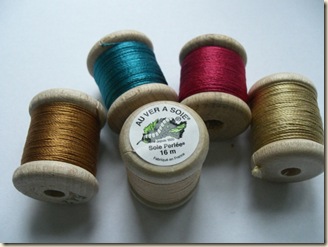
CIMG3913 

I don’t want to say how much this little lot cost, just that the red is wrong but I can’t bring myself to return it.       

Below is a comparison with a better red from Silk Mill, but I do love the lustre of Silk Perlee

Red Soie Perlee

Without your own colour cards, the disparity between screen colours and printing ink must make silk suppliers a mint, don’t you think…

Just look at this divine blue!

Blue Soie Perlee

cya!

P.S.  The colour references are from The Victoria & Albert Museum Textile Collection – Embroidery in Britain from 1200 to 1750. 

Saturday, 24 July 2010

Detached Buttonhole Faces

A final word on my (long) post about DBH circle shaping

I hope like me, you derived some useful insight from that jumbo 2-part post and all the links included therein. 

I would just like to clarify that the collection of stuff included in Part II primarily dealt with flat and loosely worked Uncorded Detached Buttonhole and only related to DBH in so far as the expanding net idea.  

You’ll also be pleased to know that for the purposes of Elizabethan embroidery, you don’t really need to go into all that complicated stuff, as they tended to use the more stable needle lace stitches, and simply take the succinct advice I received from the author of stitchingwithkittens where she very kindly summed it all up by saying:

“Either way works but if you have gaps at the margins of your DBH stitching, that means you are not pulling the thread tightly enough OR that your thread is too thin for the fabric”. 

She also added to:

“view DBH as a grid”……

(If you haven’t already done so, you should wander over to that blog and look at the quality of her stitching in close-up…)


And there you have it, sometimes you’ll hear something that makes you think about a certain thing again in a whole new light – so with that clearer way of looking at DBH I decided to revisit the specialist blog Italian Needlework and obtained kind permission to show you a gorgeous example of a particular type of DBH lacework called Aemilia Ars:

AArsWoman 

Aemilis Ars

This is an example of Renaissance Aemilia Ars needle lace.  I’m sure you’ll agree, its an amazing piece of work and pushes the virtuosity of DBH to new limits. 

Surprisingly few stitches go into making up this complex design and if you really study it, you can see its not actually that complicated. 

What’s especially interesting about Aemilia Ars is the way they lay the foundation cordonnet.  For this they use a simple loose whipping stitch over a backstitch which is comparatively flexible and is further enhanced by the addition of a series of  special tensioning ‘spokes’ that enable you to create naturalistic curves as well as sharp points and even right angles. 

What all this has to do with me

So, as a way of testing out my new-found-‘flat’ DBH clarity of purpose, I’ve set myself the challenge of making this doily. (I call it a doily because I’m going to stick it on my dressing table eventually.) 

Gauge

From the photograph you can tell that in Renaissance times they used quite a fine thread and of course a large part of the fascination is how small they managed to make this design.  I’m not, however, considering miniature this time round, as I have quite enough problems with scale in relation to my main project. 

Instead I’ve chosen to use the modern, readily available medium weight crochet thread.  I think I will learn a lot from setting myself this task and regard it as a worthwhile precursor.  As it happens, I don’t have any books on Aemilia Ars but coincidentally I came across the wonderful work of a fellow member of a forum I belong to.

Patricia Girolami

Before I continue I should explain, Aemilia Ars lace has always been shrouded in mystery but it just so happens I recently came across the work of Patricia Girolami who makes Aemilia Ars lace.  Patricia is a British lady living in Italy who is also a graduate of the Royal School of Needlework and now teaches Aemilia Ars.  She has kindly posted a fascinating set of sequential photographs on how to work typical Aemilia Ars techniques. 

She is also about to publish a book on this art form stemming from her dedication to uncovering its closely guarded working methods.  Like me, she feels keenly that we have a duty not to allow these historical, wonderfully creative ways with thread to die out. 

You can find Patricia Girolami’s work here, if you scroll down the page and look at her photos you can find the Aemilia Ars ‘how-to’ sequence.   

More Links to Aemilia Ars

If you would like to see more examples of Aemilia Ars you can also take a wander over to The Textile Blog, where you can see lots of examples of Historic designs.  I think you’ll agree with me, its proof that with ubiquitous DBH, really ‘anything goes’….


Repro Working of the Profile view of an Aemilia Ars Lady

So, down to work:

2

Above is my first toe-in-the-water type sketch.  Getting to know the main contours and the unusual profile.

6   What really struck me about this face is not so much that it’s done in DBH, but if you look closely you can see that the lines of stitching follow the contours of the face.  This idea is what attracted me most, because the stitching becomes similar to direct ‘drawing’…

3

Above is my stitch plan.

I realised after making 2 smaller attempts, that I would need to make the design much larger as my thread is comparatively chunky, so I made a print of the image and did a simple tracing.

The hair looks massively complicated but actually its not (famous last words..).  I’ve done that stitch before, its a very stable knotted back and forth commonly used in Elizabethan embroidery and all those sticky-up bits are basically whipped cords (more about that later) and buttonholing over 2 laid threads.  Again, the needle lace stitching of the windswept hair follows the meandering contours. 

5 

Here you can see my trusty paper template idea over the image to check everything.  It looks nice e.g. I’ve preserved the prettiness of the face but I found out later that you cannot sew directly from that shape. 

It needs to be exaggerated first, so that you don’t lose the important definitions when it comes to the final stage of buttonholing the edges and then (hopefully) everything shrinks back into place.

4

Here I’m checking the hair and the junction where both sections overlap. 

I’ve decided to make this piece in 2 sections and stitch them together from behind because I think that’s how it was originally made (?) and if it wasn’t, then I know my limitations…

8

Whipped Cordonnet

Here’s the ‘flexible’ whipped ‘cordonnet’ on my ‘cartonne’ (cardboard).  You need to make the holes first, by working straight down with the needle, use a thimble and protect your work surface.  Then you backstitch the whole thing. 

Next, with a single long length of thread you whip the whole lot.  When you reach the spokes, you need to do something slightly different by just hooking the thread round them, using them as anchors.  Notice the smooth curve of the chin that you can achieve using this system. 

The spokes used to tension the corners of the lips and nose, are added last of all.  Notice I have not tensioned the very tip of the nose but rather the lower edge.  Refer to the original image to see why I did this. 

The ‘flexible’ aspect of this foundation thread is very important when you come to do things like stitch the nose, because as you can see further along, when the rows of stitching that makes up the nose meets the corner of the eye, the thing pulls together so you achieve the vital contour of the bridge of the nose.

8a

Because the first one I made was so unsatisfactory, I felt I had to keep re-checking all the angles and relationships of the features very much as you would a drawn portrait.

Oh, I should mention, I now realise that I’ll be able to replicate this procedure on the Repro Bag, as I found out when I went to visit Bill Barnes, that the Museum’s website image – that’s the one available for all to see at the publically accessible website (the link is at the side here) - can be printed out and it emerges pretty well life sized!

9

Above you can see off I go and Thankfully, the nose now has a bridge!

When I first started stitching, I began from the opposite end but quickly realised the lines of stitching would never behave as I needed them to round the eyes etc.  So this time I started from the top left hand corner of the forehead and watched very carefully where I was supposed to go next by following the line map of DBH.  

The eye as you can see, is very large.  I worked out that it would need to be so,  in order for the final eye to be the right size, as that too will shrink back with the whipped edges. 

It was so revealing to follow the line map of DBH like a little maze, as only then did I really understand all the choices the stitcher had made to suggest the modelling of the face.

10

Now on this image you can see things start to get interesting. 

I needed to come down to the bottom edge of the top lip in order to join the lip to the nose, instead of gradually working my way down.  The reason for this is you want clean inside right angles, as well as outside. 

If you look closely you can see, I’m about to go under the cordonnet, then simultaneously under the return row, which is wrapped round the side, at right angles, in order to catch the apex of the top lip. 

I knew I could do this from my earlier experiments with 3-d type DBH.  This manoeuvre is a very significant one because it means you can extend DBH outwards, anywhere, anytime, flat or 3-d!

This is what I really love about Aemilia Ars, because you can create good straight edges as well as curves,  you can probably stitch virtually anything you can draw…..how exciting is that !

11

Here I’m well into the top lip by now.  It looks too big for sure but the end result will be much reduced after the buttonholed edge is applied over 2 laid threads….

13

On this row, above, you can see that soon I’m going to need to make several stitches into the lower eye lid in order to join up with the next row of stitching.  This looks wrong but if you look at the original image you can see this is exactly what they’ve done.  It means you get to very cleverly suggest an eye socket, as opposed to just a hole for an eye, e.g. you suggest the contour of the top of a cheek bone at work underneath!  

14

Just to check that its going OK and that it looks like a lady…

16


Have a great weekend!

g2g cya !