


Oh goodie, new followers! Welcome new friends!
To everyone else, this post started out as a short one, but would you just look at what happened??…
Pipeline Design Idea
I don’t usually do this, but I decided to show you what’s in the design pipeline, as it were.
I’ve been thinking about creating a little maritime scene made completely of Corded Detached Buttonhole (DBH) miniature shapes.
Especially as I’m on an extended ‘Bag Break’ and because I’m still in the proverbial ‘boxing ring’ with Stem Stitch, Satin Stitch, Radial Opus Plumarium and Bokhara Couching.
Incidentally, I think my next (little) video will be about Bokhara Couching because I just realised, I do mine differently to everyone else. I relate it to Buttonhole, in a funny kind of way. With my version, the rows of laid cords seem to fit closer together (?), but most importantly, because I’ve compared both methods closely, its my personal opinion that with my interpretation you achieve much smaller Couching stitches, as they do not unravel the thread as you work. This however, may not be to everyone’s taste, as the couching stitches do form a ‘secondary pattern’, after all.
Anyway, on to the business of the (very wet) day. A lot of the techniques for making the little elements for this piece are similar to later, well known crafts, such as Tatting and Crochet.
Finger Looms
If any of you have had (a lot of) ‘fun’ making Tatted Cluny leaves, the next set of images will not come as a surprise.
The first thing I did was to cover some stiff card with thick muslin-type fabric, that I found in a skip. I kid you not! Virtually the first thing they tell you to do when you get to Art School (to study painting!) is to go out and raid skips. Picasso (himself!) was very good at that, and made incredible sculptures with ‘found objects’. Well, my found object is a pair of abandoned, perfectly good, Ikea curtains that are very nice to embroider with!!!

In the picture above, you can see I’ve made the frame and am now constructing the foundation on which to anchor later rows of DBH. To do this, I’ve simply couched down a cord row of blue (crochet) thread with very small white (hand-sewing thread), stitches.

To make all the little bits and bobs for this project you need to be able to make DBH independently of any fabric.
The very first stage in this process is to rig up your thread around your fingers in this way.

Then, with everything in position, you start stitching…
Eventually I made this inch long sail boat.

To make the mainstay mast, you embroider a Chain Stitch band. The exact instructions for how to make Chain Stitch Bands can be found in any good set of instructions for Puncetto and is exactly the same principle as Crocheted Chain Stitch, but made with a tapestry need. If you recall, I was researching Puncetto when I was working out the whys and wherefores regarding Trellis Stitch, which resulted in another of my little videos for YouTube (link at the top of this page).
Then, after making 3 boat-shaped components, I went on to make the tiny lifesaver...

Using 2 colours formed into a ring, (more similarities to Tatting), I stitched Buttonhole Stitch over the 2 cord rows and switched colour after every 5 stitches.

As with Tatting, you will be able to close the ring at the end and weave in the tails.
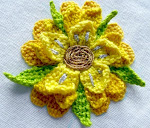
I got the idea to make this piece while making the Stumpwork Daisy Brooch (see earlier post).

Voila!

If you would like to make your own cute little DBH shapes - and there are many possibilities with this technique - it might be helpful if you were to think about purchasing my research document – see link to Etsy above – which explains the concepts of even-shaping and basic shape-making.
Gotta go ppl!


Good work thanku for sharing
ReplyDeletewww.beenascreations.blogspot.com
Thanks Beena
ReplyDeleteI'll be posting more pictures about this next time...
This comment has been removed by the author.
ReplyDelete