Friday, 31 July 2020

Update - various 31/07/20

I think it’s really interesting to note when Opus Anglicanum was copied in other countries and later times, they could never quite manage it.  For instance in later examples French ‘purses‘ with secular subject matter, you can clearly see very dark gaps between lines of stitches and in the stitches too. The only later examples of split stitch faces that seem to reinvent the style with stunning results is Dutch pieces, but they have had the benefit of the renaissance and its advances in our understanding of modelling.

To turn my earlier phrase around ‘what you can draw, you can sew’, as far as the Dutch work goes, and I think German examples too, they are such fine pieces ‘you can draw what has been sewn’, kind of thing.

So ok, what about my own investigations.
So far I’ve come up with three try outs that I’m happy with, two strips and one circle.  I’ve done about 50 so far.  I’ve got patience for this kind of thing because basically we’re trying to unravel really big ecclesiastical secrets, remember, at all times, they worked never to be copied, call them trade secrets...(for big trade).

Now in one of them, I noticed something ‘happened’, some kind of geometric quirk emerged, but I was under pressure and the phone kept ringing, so I’ll have to do them all again and hopefully the ‘thing’ will happen again.

Because, you certainly cannot write down what you haven’t understood and you certainly couldn’t explain it to another...


So, this example, I took a much longer back stitch and then went into it, from the front, as a base stitch three times.  So what you ‘see’ are evenly spaced small stitches but underneath, is quite a thick substrate of longer stitches.  I found this way of working produced a flatter surface.  For the return row, it took me back to something I worked out a couple of years back, when I noticed the difference outline and stem stitch made to the twist of the thread. Still working on the return row conundrum...

I don’t think they under stitched the work as I first suspected.
But I’m certain they stitched over two layers of fabric, linen then silk.

The silk fabric is directly under the stitches and it’s grain runs vertically, behind the surface of the work (and reminded me of Soumak weaving).  I’m still working out whether they pierced the linen for the very fine split stitch work, because especially on the faces, the stitches are incredibly fine, if not incredibly small.

The stitches on the faces are worked with very fine thread, in tight rows, going back and forth or up and down. The return row is not as regular as the first row, sometimes a lot finer. I have wondered if the return row is sometimes stem stitch?  I’m still working on that idea.  (Let’s not forget, a row of outline, followed by a row of stem, creates the illusion of an incredibly fine chain?)

The other thing about stem stitch is, it can be used to tidy up a curve...I’ll try both ways, photograph it and place it side by side with the historical image.  That’s all I do, is aim for a replica.

Some split stitches on the outer areas are quite chunky.  What you do notice the more you stare at these things, is that the silk for the faces was incredibly fine.

My personal view at this stage is, to create ‘body‘ with split stitch, you really need to work it as a back stitch.  This means that it follows there is more thread at the back of the work, but it also means the stitch itself is stronger, thereby more durable? Especially for items that were in constant use??

Let’s keep in mind that the strongest stitch you can make with hand stitching is a back stitch.  In fact machine sewing uses the back stitch as it’s basis of mechanical design.

Here’s an interesting figure, notice the pre-renaissance modelling of his forehead.  If you were wanting to stitch his forehead, you might make circles for forehead lumps....know what a I mean?


So here are the two main figures from the piece I’m looking at:


Ok, so I’ve made quick ‘road maps‘ of where I can see lines of stitching.
There is clearly a bullet proof formula going on here for the treatment of (male) faces.  The mouths, ears and hair are so unique.

Each of the figures is also not clean shaven, there is stubble, if you look really hard.
I cannot wait to make the mouths! If you think about it, lips are so incredibly difficult to sew. But their tried and tested formula gave consistent results every time. Their gaze is mostly averted, I’ve only seen a Seraphim look directly at the viewer.

The other thing to share at this point is, these faces are larger than I first thought and so there is hope for mere mortals to replicate them.  Ah that would be a fine thing...

I’ve come to realise that what held me back before in completing things was where they would end up. I was never a canvas artist, but a paper one. Don’t give me a blank wall, but give me a book any day....! So I’ve decided to make things ‘I want’ and put them in a needlework book. This page will be for 1300s.

Gotta go ppl, the day job awaits me...

Thursday, 30 July 2020

Got some goodies..


Update 30/07/2020


I came across some great links recently.  This quick sketch is of a goldwork dog in one the links.  I’m very interested in animals that are sewn using raised Stem Stitch.

You see this piece pinned many times, so I followed it back to the original poster.

I think the sketch could work as the template for recreating the dog that appears at the bottom of the image, his right hind leg needs to extend further to the left though.

His muzzle is particularly effective, it looks so lifelike!

I think ‘Benji’ here could be worked using a combination of card, wadding bound in careful netting stitches and felt.  Already have the wadding!


I reckon a motif like this is 60% preparation.

On his own, I think  Benji looks better with a bushy tail, but I think he has a small tail as part of the design within this ferocious group tearing into some kind of serpent thing there.  Must say the serpent looks very chilled considering he’s lunch.

The motif is part of a  French ceremonial sword baldric.  You can see that amazing item on the next page if you press the forward or back arrow on there, not sure which.

My eyes are a bit sore from Split Stitch analysis, so thought I would include some links of great information.


medieval embroidery


Goldwork fighting dogs


Opus Anglicanum YouTube


How to sew a medieval kirtle


Celtic Art Lecture

Celtic Gold Cape


Celtic Art


Medieval Art Good round up

Wednesday, 29 July 2020

Split Stitch Faces 29th July 2020

Thank you most graciously for comments on here.  It’s what I needed a couple of days ago when etc etc.

Ok, so real life impinged on needlework for a couple of days, but I won’t bore you that.

Here is the link to the images I’m working from:

Opus Anglicanum split stitch facesMedieval Textiles

I’m glad I’ve found theses, as they are very clear.

I really think that as these items are rotting and fading away, we have a duty to photograph them as clearly as possible, for others as well as our ourselves.

I’m just going to bullet point my observations, as my eyes are tired and I need to save time.

I noticed something ages ago, that I think are confirmed in this example and that is that the faces are possibly under stitched.....?

They young angel (I think it’s an angel) has a very interesting forehead, temple and chin.

His hair started to get me thinking. It’s not perfectly flat.

The circular stitching of his cheek is indented and forms a shadow.  This happens on the monk’s face too.

I can see the circular stitching on those cheeks are not circles, but begin with a triangular formation and work outwards as ovals, with no reserve return row in preliminary shaping.  More later...

The shadows between stitches and lines of stitches on the faces, are not dark enough to indicate a single layer of stitching, in my view.  The forehead, temple and chin of the angel confirm this for me, but I need to do more comparative replicas.

The angel’s forehead clearly shows areas of under stitching perpendicular to the surface work.  In my view this is to direct smoothness and ultimately reflection of light.

Above the monk, there are fascinating circular formations that are rotted around the edge.  These examples of circles prove to me the cheeks, chin and foreheads were not made with circles, but less regular shapes, probably triangles, as the are triangular formations on the opposite cheeks, in three-quarter profile.

The circular formations above the monk show you exactly where they took their next stitch and what their modus operandi was.

The Virgin Mary (or lady saint) is quite rotted, but her wimple at the lower edges was not.  This area of her image is similar in its surface to the faces of the monk and the angel. This lends tremendous support, in my view, to the possibility that those areas were under stitched.

Why under stitch?  In my opinion is was done to make faces even more opaque (so they might glow) and as a base for further stitches to create modelling of faces, especially when viewed in candlelight or sunlight.  Also to ensure the face would last longer. The fastest rotting occurs where silk is thin.
The longer an image can last, especially of a face, the longer the piece will retain its usefulness and....value.

The hair of the angel and monk are, in my view ‘raised’ as the curling sections are stitched over earlier stitches,  not around them.  This style of working is very creative and indicates they were in complete control of where the light will fall and what will appear in relief.

The mouths are made up of three layers of stitching, if not more.  The dark lips are set back in shadow, while upper and lower edges of lips are areas of raised ‘skin’.  There are four kinds of stitches used.

Comments most welcome.

Monday, 27 July 2020

Historical Split Sttich

I spent another really intense two hours on this conundrum.  You could say why should someone like me think they could ever suss out how they made those tiny faces?  Well, for starters I’ve got 20:20 vision in one eye, added to which I’m fixated on puzzles, and thirdly I really do believe ‘to copy is to understand’.

So I’ve made a breakthrough after a long time of almost giving up.

I mean the thing is this, when you try to reproduce very small stitches, with very small stitches and the thing STILL does not look the same as the blown up photo you’re studying, it’s so easy to just stop and give up and accept the received wisdom of others.

But a long time ago I realised I don’t give up. I just keep going until I think I’ve cracked it.
You might not think I’ve cracked it. But it’s what my eye tells me that counts, and this one eye reckons I’ve made a breakthrough.

I will add, I don’t think I could have done it without, exhaustion, serendipity and having actually seen Opus Anglicanum vestments in the duomo in Florence.

I’m too tired to post anymore. 

I don’t care that no one comments on here or even that I’ve been ex-communicated from certain places.  I will keep trying to improve my needlework and expand my vocabulary of stitches by wrestling with the past and this 20 20 eye of mine.

Let’s not forget, I’m the only person on the internet aka the world that has produced a video on Mrs Christie’s version of Plaited Braid Stitch.  Granted, she was wrong and I followed a hypothesis.  But hey, what happened after that? The world woke up to having to thrash it out with Plaited Braid Stitch.
And are we better off now, thanks to Leon Conrad and Jacqui Carey, I should think we jolly well are.

So, there you have it....we will all keep trying and in so doing perhaps attain Grace

Sunday, 26 July 2020

Split Stitch closer analysis 


When we visited Florence and I saw historical vestments, especially on the top floor of a particular duomo where they are on permanent display, I could see why the little faces on Opus Anglicanum were stitched in circular formation for convex areas such as cheeks.  If you behold them from the side they glow.  I think I mentioned at the time.

So, obviously finding a way to make very small faces appear resplendent to the congregation was massively important, especially when most people could not read and so needed to be awestruck by graphical representation. All the spiritual impact that could, had to be stitched into those tiny faces and hands, because to see them, you would be humbled and soon after it follows, you would hopefully experience a feeling of renewed faith, especially with representations of saints and angels and later, Pie Jesu himself.

Ok, so how on earth did they do it?
First off, forget cotton, you need silk.  Only silk will reflect the light off the little cheeks, heads and minuscule chins.  Also the silk you use has to be flat.  If it’s twisted, untwist it and use only one strand.

Then the next problem is Split Stitch itself
If you’ve ever tried modern split stitch, you’ll know it must have taken them forever if that’s how they used to work.

We already know that ‘forever’ in a religious order is a relatively short time, one could say.  Because while you’re waiting for the ‘second coming’ you have all the patience in the world.

But, what about when your more immediate ‘employer’ is waiting for a shipment, can stitches really take ‘forever’ in that set up? I suspect the answer to that is no.

Then you factor in the time value of money, big money...

My view is this. Old nuns with poor eyesight were employed to stitch, as well as young ones with 20:20 vision.  So if the stitch ‘took forever’ the older nuns would be redundant - methinks not.
Anyone that has spent their life sewing, was never going to be retired.

Ok, so your Order lives in a convent on a hill and you can make 20 little faces in 6 months. Your main customer is an Italian Bishop and you tell him the vestments he wants will take 7 years.
How do you eat as a cloistered congregation till then?

Yes, they grew vegetables etc but my view is, they worked to output, they worked and worked and achieved wealth for their dioceses.

This leads me to conclude: I think they produced split stitch in a much faster way: as a variety of Back Stitch, much like Stem Stitch can also be described in this way.  And in so doing, they were able to sew many more little faces.

So
In revisiting Split Stitch, I pulled out my research notes from last time and picked up where I left off. It doesn’t matter to me that I didn’t spend months and months on the problem, all I needed was to zone in and when so doing I will only trust one thing, well two really but the other is private.  The one thing I trust for you to know, is my own eyeballs.

My own eyes tell me that in this piece:

There are at least four different ways to work split stitch.  Furthermore, split stitch really is only trying to be the finest possible Chain Stitch.

But then I further discovered, after about 4 hours of thrashing it out, that you cannot possibly make tiny spirals out of  Modern Split Stitch and have the stitches crammed in as we so often see, because there isn’t enough room to manoeuvre the needle.  But YOU CAN work super tight spirals if you complete the work as a Back Split Stitch where you pierce the previous stitch in a downward action.  This means you can see exactly where to go and it saves a whole heap of hit or miss.

Comments most welcome.

I think I need to do another YouTube video....

Saturday, 25 July 2020

Underside couching of silk thread

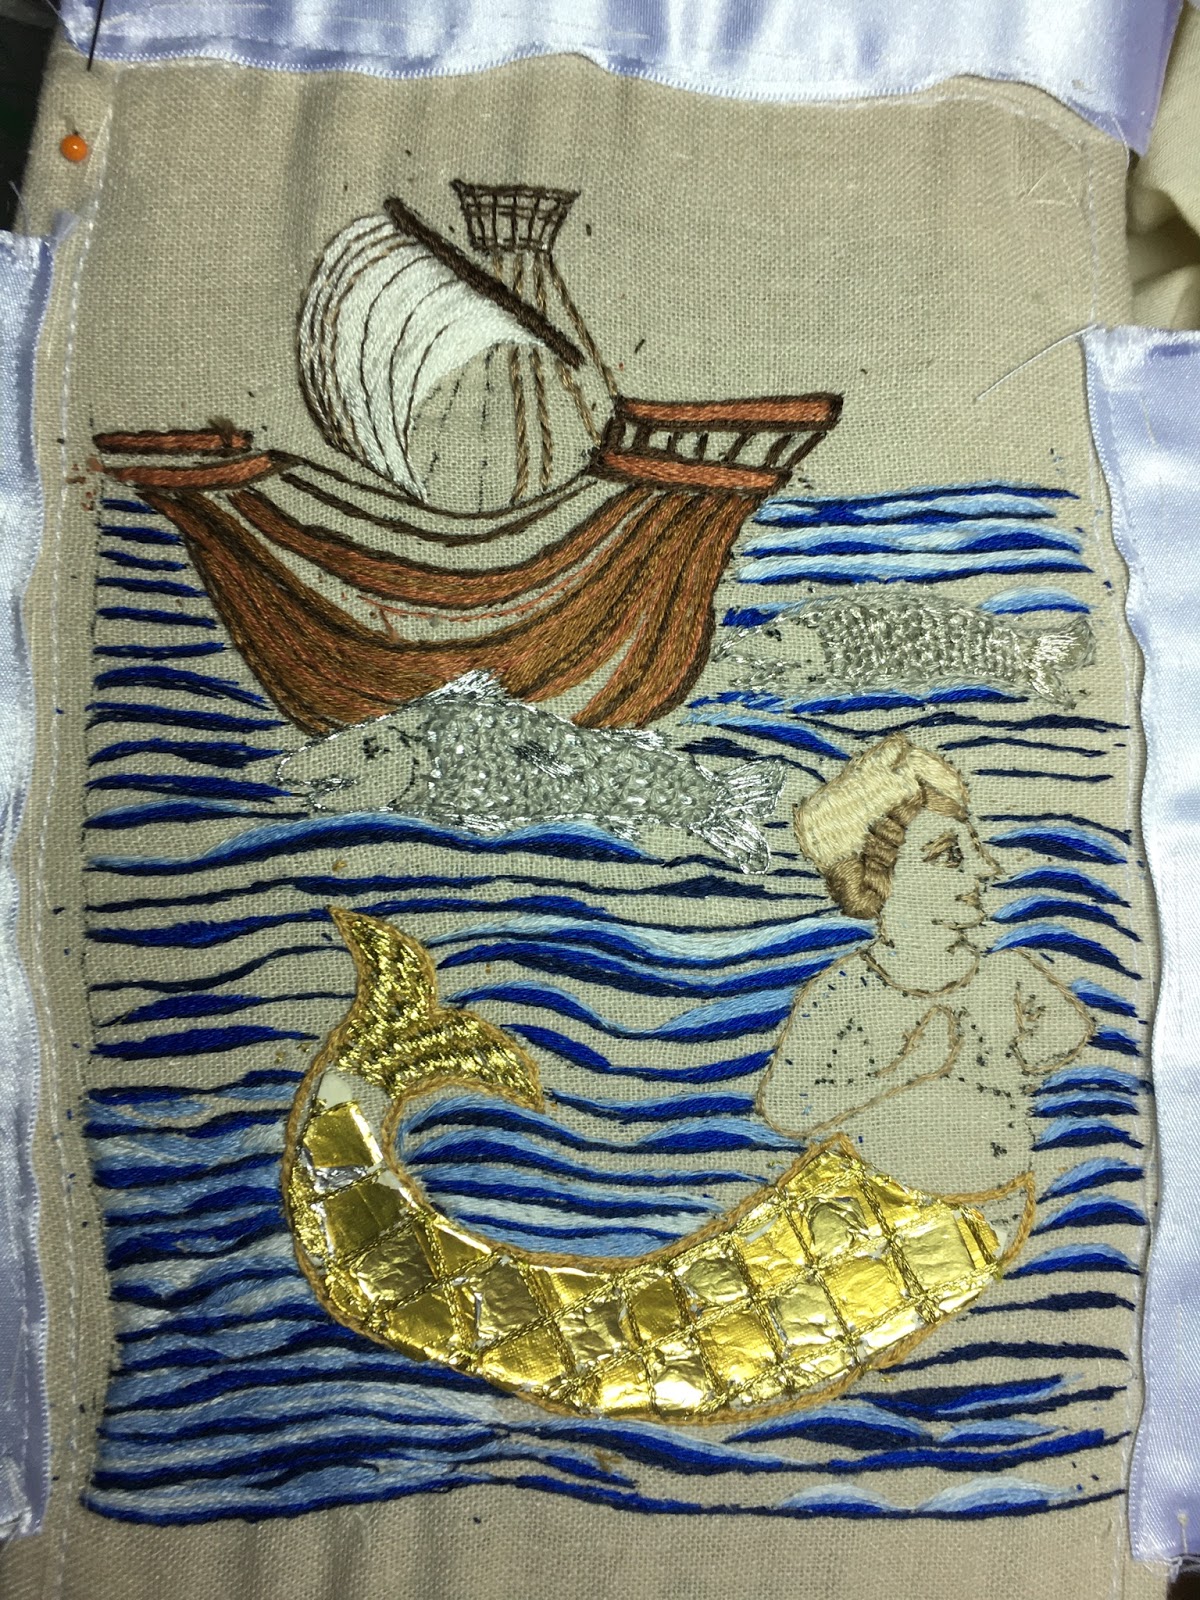
I don’t have the drapery of clothes to deal with in my mermaid image, but I will when I come to do the Waterloo artilleryman.  I’m thinking the discovery that you can create the illusion of folds in fabric with underside couching has given me a lot of food for thought.

When looking at medieval images and their language of stitchery, what strikes me most is the mini stage-set of their designs, that convey spiritual sensibilities alongside human endeavour.

St Cuthbert is a figure that has interested me for a long time, especially as iconography connected to him and his life is essentially Celtic.  Here’s an interesting image, not a million miles from my WIP.

It’s fascinating how succinctly they deal with the treatment of the sea.  As a sinuous, essentially triangular shape, it conveys the heaving, perilous, all- about-you -waiting-to-swallow you up feeling as a description of the dangerous and precarious journey these travellers took.  Faith amidst uncertainty is the underlying message.

Pre and post Reformation, St Cuthbert’s tomb still attracts countless pilgrims to visit the Holy island of Lindisfarne.  In fact the name alone ‘Lindisfarne’ holds deep significance in English culture along with the other very famous spiritual island called Iona.

English people feel a connection and reverence for those places, that crosses all borders and generations.  Essentially they represent the early, pure form of Christianity, fresh out of Israel, before being overtaken by the power of Rome.

The manuscripts, relics, jewellery and carvings made by monks and nuns from those times in England are deeply cherished in English culture and the wider Anglo Saxon community.

Cuthbert, although an Anglo Saxon himself, maintained a profound affinity with the graphic preoccupation of Celtic spirals and mind-boggling interlacing and the sense of continuity that reinforced whilst transitioning the people to the new religion.

I like this image a lot....

Friday, 24 July 2020

String padded goldwork

Taking a step back and wondering how I’m going to deal with the sky in this piece?


It occurred to me that ‘a sky’ won’t be enough.  It has to be a sky that is framed within something else somehow.  Because design-wise, the gold and silver will look too overbearing without something to balance them at the top of the image.

Luckily I can play with design problems such as this in my own mind and don’t have to be rummaging in my stash to find objects of inspiration.  Pinterest helps a lot, when I’m checking styles generally.  I also decided to cut out paper templates at the weekend and play around with a composition then.  Clearly this piece is turning out to be much more serious than I first planned and a real journey of discovery that has cheered me up so much during this weird time for the entire human race.

I decided I need to create a surface texture that pulls you in and also can look effective from a distance. So I decided to dig out my close-ups of a piece in the Ashmolean Museum.  I’m especially pleased now at the amount of detail I was able to capture at that resolution.  Reminds me to take that camera again.

For instance, you can see that when they did underside couching that little bits of the couching thread could still be seen.  Also look at the dark outlines, just like in later manuscripts.  They make it look like ‘anything you can draw: you can sew‘, which is incredibly inspiring...