


This post continues from the last and could (possibly) be described as text light/ picture heavy? – then again, maybe not !!

I found using a stem stitch outline together with the ‘Hook Method’, to be very easy to work. If you recall, I mentioned I was not fond of the Hook Method prior to this, as I found it difficult to control and it meant I had to make lots of ‘little decisions’ that would inevitably slow me down.
Below are some sequential images to show you how I tackled anchoring the cord row and the orientation of the needle.
As you will be able to tell, the working thread basically ‘snakes’ its way up the piece, in a big wide zig-zag, that means everything you do after that remains very logical and flat.
But what’s particularly interesting about using Stem Stitch to outline was, to my surprise, the subsequent rows of DBH blended in with the slanting stem stitch at the end of the row, instead of disrupting the pattern. Once I realised this, I was able to pick up considerable speed and just stitched up the rest ‘on automatic’, as it were.
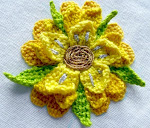
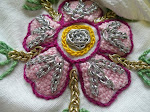
I increased both red petals differently. The one on the right is ‘correct’ but the one of the left was kind of, experimental, shall we say…
The best way I have found to increase these shapes is to find the ‘little leg’ of the very end of the row, that is the horizontal thread before the first loop, and make a stitch in there. Sometimes its quite hard to find, but believe me, its in there! You do exactly the same for the opposite side.
Below I have reached the end of the row, (working right to left if you are left handed - and visa versa for right handed) and am going into the stem loop at the end of that row but from the inside.

I then go into the next stem loop, immediately above it, by coming in from the outside.

Below you can see the new cord row is now anchored into the left side and tensioned thus far. See how from this viewpoint, the ‘turning’ thread appears invisible because it ‘winds in and out’ rather than ‘wraps around’ the outline.

I did exactly the same on the other side, coming out from the inside

and going back into the loop immediately above.

This sequence means that you are then in the best position to start your new row of DBH stitching, because the working thread is already in place, across the path of your needle, see below.

3-d Tips that emerge from a 2-d Shape
When I came to make the tips, I used the 3-d method I discussed last time. I chose this method because I was aiming for a slender section of decreases that could then be moved slightly into position, according to the orientation of the petal. But most of all, because it looks to me as if they constructed these details in a similar way historically.

This way of working may appear time-consuming and fiddly at first glance, but quite honestly, I find the reverse to be the case, because you literally have more ‘freedom’ to work.

I followed the logical 4,3,2,1 decrease for each tip but sometimes I needed to start with a row of 5 stitches to even-up the overall proportions. This meant I ‘Made 1’ by going to into the first stitch twice. I can see that they did this on the historical Carnation that this study is based on, too. This is further evidence, perhaps, that they did not strictly count the stitches but ‘visually judged’ the size of some details.
The interesting thing about this way of working is, that each tip appears slightly different because they are literally ‘handmade’. This ‘individuality’ always struck me on historic examples.
They are then secured with a detached chain at the apex, for which you sink your thread in the fabric. Then I took 3 inconspicuous running stitches down each triangle to start the next.
If I could find a picture of the back of an historic example of these shapes, I could perhaps corroborate what I have interpreted? I have been able to count the stitches as closely as I can though.
A final word about the stem stitch outline
I find this way of working, personally, very encouraging but I had a small problem at the end, that I am not sure is a larger problem with a twisted thread, than it would be with a filament? Looking down onto the piece the outline appears smooth, however, if you look at it sideways on, there is a tiny bump ‘extending’ the slant of each stem stitch.

Gold Coiling Stem
For this part I selected a Threaded Twisted Chain Stitch, that is featured in Sweet Bags, for which there are very clear instructions.

Considering I was using only gold knitting yarn, I found this stitch worked up very easily and was able to achieve consistent results quickly.
A Small White Rose
Then I revisited an image of a small white rose that led me to try something else out.

Small and unassuming as it is, this Rose represents a very exciting possibility for me. I leave you to guess what is different about it….
Really must dash !
P.S. I’m going to post ‘Pattern Part 1’ very soon.


The cream and red combination looks very bright and the work is so beautiful.I love this and it is very inspiring too.
ReplyDeleteHi Mahalakshmi!
ReplyDeleteYou are so encouraging. I really appreciate it!
Glad its giving you ideas for your own creations, in my view that's
what its all about, to make connections then go create !
Dimensional embroidery is definitely enjoying a massive revival, just look at the incredible number of books out there now...