


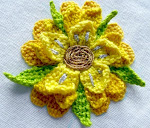


You know, I was really quite disappointed with the contemporary red rose I made last week. In my excitement, I think I inevitably tried to do too many things at once, as you do, and ended up with a woolly mishmash.
So, feeling I couldn’t really leave things as they were, I did a bit more work on it and here’s what I ended up with. Its still not what I’m after, but I think its quite a nice little thing, if I may say, so I wont be pulling it out. It needs some leaves etc and I thought I could maybe use it to decorate a needlecase and put 4 of them at each corner on the front, linking them with gold cording or metallic green stems of some description. Alas, I don’t have enough time for that right now, so I’ve drawn a quick sketch of that idea and stuck in my ‘ideas’ book.
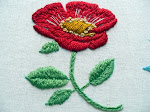
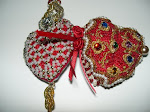
You can see below that my inspiration in this instance is a Hybrid Tea.
Its still not a very successful ‘furled central cone’ but there was some serendipity along the way in that, because the ‘cone’ collapsed, the resultant form turns out to be reminiscent of a cabbage rose and I don’t mind that because they’re nice and old.

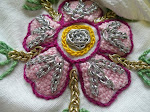
This is what I’m aiming for:

If you recall, last year, after I discovered that I could make these little flaps of Detached Buttonhole (DBH) I became very concerned with creating accurate right angled corners and inconspicuous mid-air return rows because I needed to find ways to keep the sides from getting lumpy and to maintain uniformity. I figured that if I understood the correct technique for that, then I could make lots (and lots) of flowers!
This year, however, what with working from The Bag image and the discoveries I’ve made so far with the first Blue Flower, I can see that my concerns need to progress to ‘how to turn squares into curved shapes’ –see further along for more about that.
To save newbies having to read back to those original posts, here’s a brief description of how you make the outer petals of the yellow rose. The construction is different to the method described for the Gold Petal. Here’s a quick diagram of both methods plus at the bottom you can see I’ve also included a diagram for the basic petal shape for the next flower on the bag, which you will notice is tapered (see earlier post for a drawing of that).

It looks very straightforward and it is. What you do is this:
1. Make a base line of standard chain stitches, start this line of stitches from the correct side. What I mean by this is, consider that when you commence buttonholing, you will always be working TOWARDS your dominant hand. This will ensure your buttonhole stitches lie flat, are fast to work and are smooth-looking.
2. Work your first row of standard Buttonhole stitches, going underneath each chain stitch twice or 3 times.
3. When you get to the end of the row, take a long straight stitch return row behind the work and come up out of the first stitch, from behind, like this:

Here its being pulled tight.

4. When you get to the other end, make sure you go into the very last stitch, it will look funny because it kind of shrinks but you learn to spot it, see the Gold Petal post for a picture of that.
How to turn right-angles into curves with DBH
Below is quite a neat curved corner.

Last year, the way I made curves like this was, I went round the whole thing at the end with straight buttonholing. This year I’ve found out a quicker method.
To create this curved corner you learn to do 2 things:
1. When you reload your needle, you take a couple of standard buttonhole stitches on the way back up from emerging through the fabric and in turn,
2. When you ‘end off’ at the other end, you creep down the petal edge towards the ground fabric again making normal buttonhole stitches into each edge DBH stitch.
*I hope to do a video of how to make one of these petals for next time.*
Curl
From what I’ve discovered so far, curl is a by-product of making these little shapes. I’ve found that you can make the curl go in the opposite way if you really want to, by tweaking them afterwards, but the natural direction of the curl formed by these little elements have a charm all of their own. So I don’t tweak them afterwards or wire them or anything, what you see is what you get!!
I should mention, when I’m this excited about making new flowers with these ideas I don’t draw them first, I just go round and round, overlapping petals and making each subsequent row of petals larger than the preceding set. This can cause you to lose quite a bit of time, so I would have a basic plan to hand, like:
1. Cone: spiral – Brussels Stitch
2. 3 small petals – Brussels Stitch
3. 5 larger petals - DBH
That’s my basic recipe so far, and as you can see, what I’ve aimed for this time is simplicity.
But saying all of that, I should mention there is something else going on here.
In going round and round like this, and always mindful that the corolla will need to be photographed, I’ve found a way to enhance perspective by pegging down one edge of the petal further out than on the other side. What that means is that the uppermost shape you create will be of a ‘teardrop’. To help me with this, I found looking at the corolla at eye-level and turning it round to reveal which way to achieve this. Its a visual thing, so you just have to try it for yourself.
For the next flower on The Bag, perspective is handled very adeptly, and so I want to stay close to those lessons.
Here’s what I mean:

This picture sort of shows what I mean with regard to pulling one side of it out a bit further than the other and pegging it down so that it’s bunched a bit at one end: ‘pull and peg’.

So that’s all I wanted to show you about my own way of doing a modern rose. I’ll be coming back to this idea often, as the mood takes me…
Progress Report on The Bag
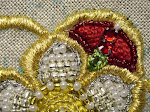
My Lurex, spangles, smooth purl, pearl purl etc etc have all arrived and have been checked and tested. I have 2 lots of Lurex, one will do Trellis Stitch, the other type wont. I’ve decided to do the background in 90% silver passing Number 4. This is the thinnest real silver thread I can get. Lurex is 0.33mm and the passing number 4 is 0.35mm, so the difference is very small just as on the bag.
The image of the bag indicates that background silver is slightly thicker than for the motifs and has different segmentation. The silver they used for the motifs is the same silver they used for the cords, doubled-up. From this careful examination of the image, I have concluded that they probably used flattened silver wire wrapped round a silk core for the Gobelin background but for the tiny knotted motifs, I think they used gilded parchment.
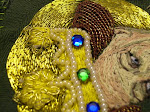
It will be a little frustrating to use the Lurex as you don’t have to do much with it before the core starts poking out. I should also point out that on the museum image, there is no core sticking out, anywhere.
In terms of deterioration, what has happened extensively on The Bag is that the thread used for securing the smooth purl has snapped in various places. Other than a damp patch on the bottom left side, The Bag is in remarkable condition.
For the next motif I will need Bullion, which I don’t yet have, so I’ve decided to satin stitch those areas for the mock-up.
I’ve been invited to go along and speak at a group that meets on the coast. So to help me with that, I intend to make a mock-up of each motif the same size as the last one, that means at the end I’ll be able to make a fabric book which can be handed round the class. As the bag will have real silver thread, I would prefer them not to handle it too much.
Now I have to choose the silk. I’m going with The Silk Mill’s divisible thread. Thankfully there is enough colour on The Bag for me to carefully match each colour with the pigments in Watercolours. It’s pretty difficult I find, to choose colours over the internet but that is what I’ll have to do as I am nowhere near any silk thread retailers.
Anne of Cleves House
Oh, for those of you visiting the Southeast this Summer, thought I’d tell you about Anne of Cleves house that I passed the other weekend, which you might like to visit. I didn’t actually go inside, but I had to show you this because I so love Tudor kitchens! Obviously, the one at Hampton Court is par excellence but I think as Tudor divorce settlements go, she didn’t do too badly.

I think you can just see below, Anne’s Kitchen now also houses the Gift Shop!

cya!


No comments:
Post a Comment